
I have been tasked with the challenge of coming up with other uses for Kleenex brand tissues as a part of a Crowdtap sample and share challenge I am taking part in. I have spent days trying to come up with ideas for these tissues, when suddenly an old idea came wandering back into my mind; mini roses.
I attempted this idea once before using magazine pages, however the magazine pages ended up being too thick and would not properly roll together, not to mention that cutting them in half to make them the proper size would have required a hand saw.
Kleenex tissues are much lighter and thinner than magazine pages so when I decided to give this a try I was very hopeful that this time I could pull it off. As you can see from the photo above I managed to do just that.

Step One:
Gather the materials you need; Kleenex brand tissues, modpodge, a paintbrush, a toothbrush, and of course coffee!
Gather the materials you need; Kleenex brand tissues, modpodge, a paintbrush, a toothbrush, and of course coffee!
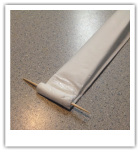
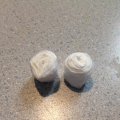
Start by folding the tissue over 4 times; folding vertically.
Then roll onto toothpick until the toothpick is once, then smooth a little bit of modpodge and continue to roll, repeat until the entire tissue is tightly rolled onto the toothpick.
Then roll onto toothpick until the toothpick is once, then smooth a little bit of modpodge and continue to roll, repeat until the entire tissue is tightly rolled onto the toothpick.
 |  |
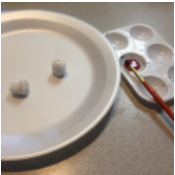
Next comes the paint. I use a Styrofoam plate to keep the mess contained.
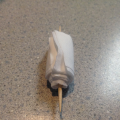
Spread modpodge over all of the outside of the rolled up tissue and let it dry.
Once it has dried remove it from the toothpick and carefully cut the rolled tissue in half. It will be somewhat difficult to cut, but stay at it because it can be done.
Once it has dried remove it from the toothpick and carefully cut the rolled tissue in half. It will be somewhat difficult to cut, but stay at it because it can be done.
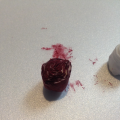
You can choose any color you like, for this project I chose to use a deep red to paint my roses. I also dab the paint on the rose in order to leave some of the white still visible on the top and to give the sides a more realistic look.
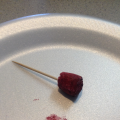
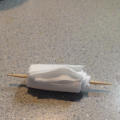
There are many ways to create a stem for your rose. You could use the toothpick you used to create the flowers, you could also use floral wire, a twig, the possibilities are endless. For my project I chose to use two toothpicks. I painted them green and then dipped the end that I would insert into the rose into modpodge.


Allow the paint to dry and your roses are complete. You can then use them to make a styrofoam wreath, use them for decoration, add them to your favorite hair bow, whatever your heart desires. I chose to use them as a decoration in one of my favorite tiny tea cups.
I would love to see the ways in which you chose to use your mini roses. I hope you enjoyed this tutorial. If you have any other ideas or would like to share photos of your finished craft please do so in the comment section.
From my home to yours, Enjoy.
From my home to yours, Enjoy.